Pages

Showing posts with label DIY. Show all posts

Thursday, October 31, 2013

Pumpkin Fun

I've never been much of a Halloween person, but I do love fall, and always buy pumpkins to decorate with. I've been wanting to carve some for years, but the mister and I never seem to make it happen- until this year. Since we're not really into Halloween, I wanted to use designs that would last into November and just feel like fun fall decor. Last week my friend Kristin reminded me about the notion of using a drill rather than carving the pumpkins and it seemed simple enough so we went for it.


Seriously- this was the easiest pumpkin carving ever. The drilling can get a little tedious, but it was so quick to make such pretty designs that it was totally worth it.


Here's the rundown on how to do it:

1. Cut the top off the pumpkin as usual, leaving an opening big enough for your hand to reach through. Set top aside.

2. Scoop out the pumpkin 'guts' using a spoon, your hands, a plastic scraper, or whatever else you have on hand that works.

3. Once the inside is all cleaned out, layout your design on the pumpkin with a pencil or pen. Since we were doing holes anyway, we used the tip of a retractable pen with the pen part retracted and just made tiny little indentations where we would later drill. If you're stuck for design ideas, just do an image search for 'drill carved pumpkins' to get some inspiration.

4. Now that your design is plotted out, get to drilling. Try using multiple bit sizes to make your pattern extra interesting. Be sure the bit goes all the way through the shell so that you don't have little bits showing once it's lit. This part can get a bit messy- little pumpkin shavings kind of fly everywhere, so make sure your work surface is covered and don't do it too close to any furniture you don't want to clean pumpkin off of.

5. Clean out any shavings that ended up inside the pumpkin, and you're ready to light it!

See- so easy. If you don't have a pumpkin already- you can easily whip up one of these in less than an hour and use it tonight!

I hope you all have a great Halloween. Since I'm in my hometown for a wedding this week, I get to see my nephews and niece in their costumes today- a special treat since they live so far away!

Monday, May 6, 2013

DIY: Solid Perfume


I first encountered solid perfume in a vintage Avon locket- it didn't smell very good at all, but it did seem like a great idea. Turns out, solid perfume has been around since ancient Egyptian times- so apparently people throughout history thought so too. A few years back I started making my own solid perfume lockets, as part of my jewelry line. Simple to make, using all natural ingredients, solid perfume can double as aroma-therapy, and makes a great gift- Mother's Day is coming up after all (hint hint). 


To make your own solid perfume you'll need:

2 Tbsp. beeswax, grated
2 Tbsp. almond oil
40-45 drops of essential oils (starter scent recipes below)
{All the above supplies can be found at natural foods stores. For a complete selection of essential oils, Mountain Rose Herbs is a great, affordable online source}.
Containers for your solid perfume- I used a vintage stock locket like this, and these little tins, but even an empty chap stick tube or lip balm pot will work.


Start by bringing about an inch of water to boil in a small saucepan. Reduce heat to low. Measure beeswax into a heatproof glass measuring cup and place in the hot water. Wax will begin to melt. Once it is completely melted, add the almond oil and stir until combined (I like to use a wooden skewer, since some essential oils can affect plastic or metal). Remove from heat.


Let oil/wax mixture cool for about a minute, then add essential oils, stirring to incorporate.


Once oils are added, quickly pour the mixture into the containers you've chosen. If you're using a locket, pour very slowly to avoid spilling. 


Once the perfume has cooled completely, it's ready to be used- just rub your finger over the solid perfume and apply to your pulse points, or anywhere you normally apply perfume. 

Essential oils come in a variety of 'scents', so you can really create a perfume that is uniquely yours- just spend some time at a store that carries the oils, smelling the tester bottles to decide which you like best. To create a scent with layers, mix several oils together. Essential oils are also used for aroma therapy, so you can create a perfume that also serves a purpose- the scent I made today (recipe below) is great for headaches, which I'm sure many moms out there could use some relief from. 

Though the combinations are nearly endless, here are a few recipes to get you started:

Headache Relief: 25 drops peppermint + 15 drops lavender
Smells Like Summer: 15 drops sweet orange + 15 drops lemon + 5 drops mint + 5 drops bergamont
Sweet and Spicy: 20 drops sweet orange + 10 drops ginger + 10 drops clove
Woodsy: 20 drops sweet orange + 10 drops ylang ylang + 10 drops sandalwood


If you'll be making this as a gift- try to think about the recipients favorite scents, taking hints from the perfume they wear or what candle scents they enjoy. 

Do you have a great essential oil recipe? I'd love to hear about it- leave a comment below so we can all try it! 

Monday, April 29, 2013

DIY: May Day Treats


Did any of you celebrate May Day as a child? I don't remember doing it regularly, but I know there were several years where we made little baskets out of construction paper, filled them with treats, left them on the neighbors doorsteps, rang the bell, and ran away before they could detect who left the little surprise on the first day of May. May Day has a long established history, which I won't go into (if you'd like to learn more, Wikipedia has a great deal of information on the holiday), and though it's roots are in pagan festivals, I've always loved this tradition of surprising your neighbors with a little anonymous treat!

For this DIY, I kept things simple. Though you may not have the exact supplies I'm using- the basic concept can be adapted for pretty much anything you have on hand. This is also an easy project, so it's a good one to get the kids involved with! Let's get started.


For the paper cone (or Tussy Mussy, to use the fancier, vintage term) you'll need:

Heavier 8.5"x11" paper (use whatever you like or have on hand. I used this paper in 'paper bag').
Washi tape (again, use what you like- I picked summery colors/patterns).
Twine, cord, yarn, ribbon, or wire (any of these will work).
Hole punch in a small diameter
Scissors


With the sheet of paper oriented with the long side facing you, work the bottom right corner to curl it slightly.


Starting with the bottom left corner, gently curl the left side of the paper towards the upper right corner.


Roll until you have a cone the shape and size you like. For small treats you'll want a tighter, more narrow cone. For larger items, it's best to keep the top opening as wide as possible.


Once your cone is shaped, tape the loose edge down with the washi tape- pressing firmly to make a good seam. Since I did larger sized treats, I made my opening wide, which left that hole at the bottom- no need to fix it- the large items won't fit through there.


To ensure your cone doesn't come apart, tape a 'seam' at the spot where the inside corner meets the back of the cone. You can do this with either washi tape, or Scotch tape- if you'd prefer the seam be less visible.


Now that your cone is assembled, punch two holes near the top and towards the back, about 1/2 an inch down. You don't have to be exact, just pick a spot where the hole is far enough from the edge to not rip the paper, and far enough back to keep the cone balanced once it's full.


Feed one end of your twine (or other material for hanging the cone) through one of the holes and tie a small knot to secure it. Repeat with the other side. You now have a complete cone, ready to be filled! Repeat until you have the number of cones you plan to deliver.


To fill the cones you'll need:

Fresh flowers
I used ranunculi, but if you plan to do multiple flower filled cones and want a less expensive flower, mini carnations in a single color are a great choice- they smell nice, are actually quite pretty when arranged well, and last a very long time).

Fruit, candies, small cookies, or any other treat you can think of.
I used strawberries because they're in season here in Cali, but small tangerines, kumquats, or other small fruits would be cute too. I didn't have time to bake anything so I picked out some all-natural fruit jellies from Trader Joe's. If you'd like to bake something any small cookies would work- I think Mexican Wedding Cakes or Macaroons would be charming and are the right size for the cone.

Disposable pastry bags cut to the size of your cones.
I used these for several purposes. With the flowers, I put water in the bag so the flowers stay fresh while they're waiting to be discovered. I put the berries inside one to keep them from bleeding through the paper. With the candies, I used a bag to keep the sugar coating from getting all over and attracting ants to the neighbors door. Depending on what you fill your cones with you may not need the bags.


A quick tip- while you're arranging your flowers in the pastry bag, set it inside a glass to keep your hands free.


The last part is easy- fill your cones with the treats you've selected, make a little tag out of whatever you have on hand (just don't put your name on it- the fun is leaving these anonymously), and deliver them on May 1st! Ringing the doorbell is optional, but it's best to leave these for people you know will be home within a few hours of leaving it- that way everything will be fresh and tasty.

My favorite thing about this project is how easily customizable it is- I made a few variations, but you are only limited by the supplies you have on hand. Be as creative as you like.


Do you have any May Day traditions? I'd love to hear about them!

All styling and photos by Danae Horst for Gather and Hunt

Wednesday, March 27, 2013

DIY:Simple Spring Vases

Confession- Easter totally snuck up on me. For some reason I had been thinking it was in April, only to discover a little more than a week ago that it was in fact at the end of March. After a minor panic attack, I went into planning mode, knowing that whatever I choose for Easter posts, simplicity was key- for folks like me who didn't have much time to work on elaborate crafts and recipes.


I'll be sharing our Easter table tomorrow, and the menu and some easy recipes on Friday, but I thought I should start with the DIY- so you'll have enough time to make it for your Easter table if you want.


I've been really enjoying keeping things simple lately. With the arrival of spring, a clean and simple palette keeps things fresh for me, so I let that freshness inspire our table setting, and this easy rope wrapped vase (or candle holder).


For this project you'll need:

Empty glass vase or jar
Heavy duty cotton twine
Scissors
Safety pin
Hot glue gun


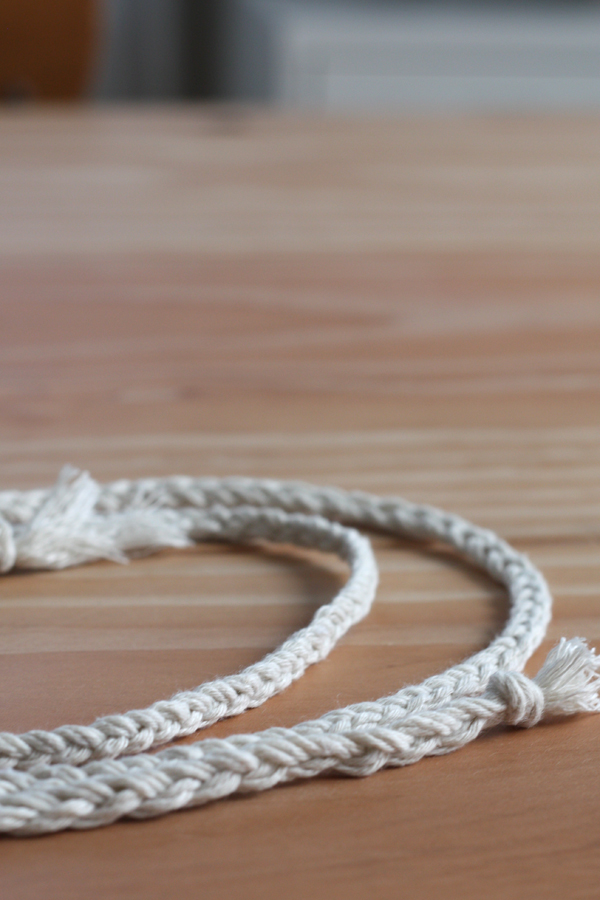
Begin by braiding three strands of twine together. The length of the strands will depend on how big your vase is, but you'll need about two times the circumference of the vase multiplied by the number of times you want to wrap it (sorry for the math-speak). I find it easiest to use a safety pin to anchor the braid to something sturdy. Braid as carefully as you can in order to keep the cord flat, rather than twisted.


Once you have a braided cord of the length you need, tie a knot at both ends.


Attach the cord to the vase with a small amount of hot glue and let cool. Don't worry if glue seeps out around the cord, you can either remove it when it's still warm, or cut it away with an Exacto knife later.


Begin wrapping the vase, pulling the cord as tightly as you can without dislodging the glued end. Wrap until you've reached the end of the cord. Secure the end with more hot glue. 

If you prefer to hide the ends, rather than have the knot showing, cut the knot off, apply the glue and tuck the end behind the cord above it to secure. 


There are a number of variations you could try with this projects as well: wrapping it with unbraided twine or a piece of cotton rope; covering the rope with sections of colored thread; using colored twine instead of natural; etc. If you try any of these, I'd love to see!


Once your vase is complete, use it however you fancy. I planted herbs and flowers in mine, which will serve as the centerpiece of our Easter table, then be transplanted outside in a few weeks.

As always, if you make this project, share your photos with me- tag me on Instagram (@gatherandhunt) or Twitter (@gather_and_hunt), or post it to the G&H Facebook page!

Monday, February 11, 2013

DIY: String Art for Valentine's Day

I know, I know- another DIY? I promise- this isn't becoming a craft blog, I've just been having a lot of fun crafting lately and thought maybe you would all like to join in on the fun.

1960's string art
{Via Little Byrd Vintage}
Have you noticed that string art is making a comeback? Based on activities, meant to make math concepts available to children, created by the mathematician Mary Everest Boole in the late 19th century, string art became popular as craft in the late 1960's.

String art from the Bing lounge at Alt Summit
{Via Camille Styles}
Today, string art is popping up everywhere. There were even several impressive string art installations at Alt Summit this year, which sparked the idea for this DIY.


Keeping with the ombre theme I decided on for Valentine's Day this year, the mister and I created a few pieces of string art perfect for the holiday, but simple enough to use for other occasions as well (weddings, anniversary parties, etc).

Ready to make your own piece of string art?


You'll need:

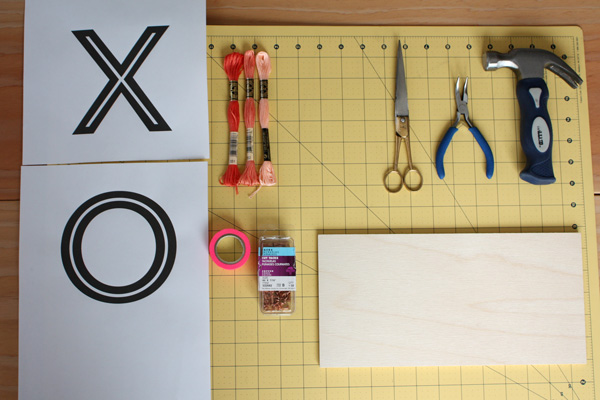
A stencil for the pattern you want to make. I just picked a font I liked and printed out large letters. (The font I used is Trend Sans 5, available from My Font and on sale right now).

Wood- for this design I used a piece of basswood 12 in x 6 in (available at craft/hobby stores)

Cut tacks no longer than 7/16 inch, depending on the thickness of your wood. I choose copper tacks to match the colors of my thread, but they also come in silver and black. Other DIY's for string art use other kinds of nails or tacks- choose what you prefer, just make sure they have a decent sized head.

Embroidery thread in desired colors. For the ombre look I used three colors (DMC #351, #352, #967)

Hammer (I had the best results with my short and stubby hammer, but any size will do)

Pliers (preferably bent nose jewelry pliers)

Scissors

Washi tape (or any light tack, removable tape)

Optional:

Ruler (to measure the space between tacks)

Self healing mat (to protect your work surface)

Let's get started...


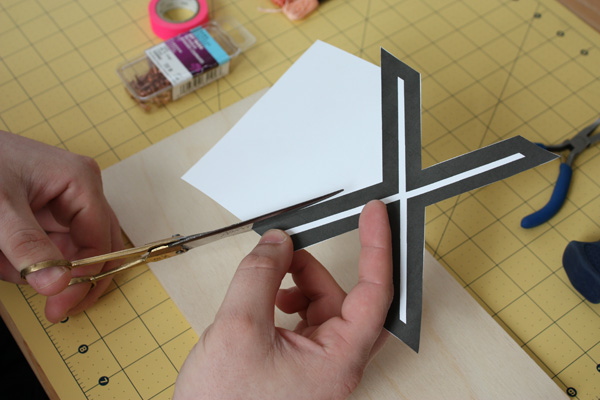
One.

Cut out your stencil. For letters, don't worry about cutting out the inside of letters like 'o', 'a', etc.


Two.

Using the washi tape, tape your stencil down to the wood. Be careful to not place the tape close to the edges.


Three.

Line your stencil with tacks. Use the pliers to hold the tack while you hammer it into the wood. This will save your fingers and keep the tack from going in at an angle.


Four.

Remove the paper stencil by gently pulling it through the tacks. Don't worry if a tack pops out- just hammer it back in.


Five.

Start your thread by tying a double knot around one of the tacks (start where ever makes sense to you, it doesn't really matter).


Six.

Line the section you're working on (if you're only doing one color, line the whole shape). You'll need to decide which makes the straightest line- lining the inside or outside of the tacks- then loop the thread around each tack to secure it.


Seven.

Begin filling the design in by crisscrossing the string around the tacks. This is fairly free form, just make sure to cover the whole section by looping around different tacks and using different angles until you're pleased with the design.


Eight.

To finish a section after it's filled in simply tie another double knot by looping the end of the thread around a tack and knotting it.


Continue steps five through eight until each section is complete, and you're done!


There are countless designs you can use for a string art project, we did two word designs and one large heart, all using an ombre pattern. What design will you use? If you make your own string art I'd love to see it! Send me a photo or tag me on Instagram (I'm @gatherandhunt).

P.S. Special thanks to my mister for being the hands in this shoot. It's the first time I've done a DIY where I didn't have to fake complete a step with my left hand while shooting with my right (I really need a better tripod).

Pin It button on image hover