
 |
| 1960's string art {Via Little Byrd Vintage} |
 |
| String art from the Bing lounge at Alt Summit {Via Camille Styles} |

Keeping with the ombre theme I decided on for Valentine's Day this year, the mister and I created a few pieces of string art perfect for the holiday, but simple enough to use for other occasions as well (weddings, anniversary parties, etc).
Ready to make your own piece of string art?
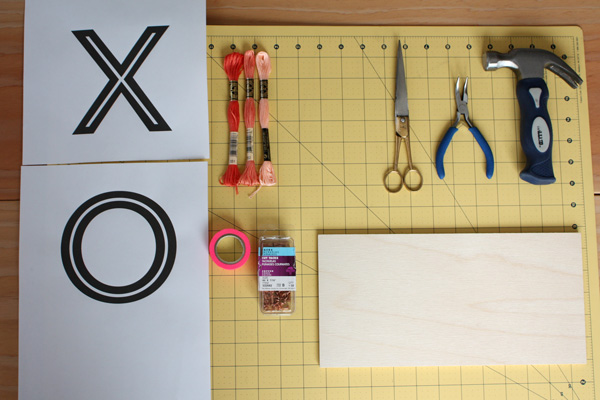
You'll need:
A stencil for the pattern you want to make. I just picked a font I liked and printed out large letters. (The font I used is Trend Sans 5, available from My Font and on sale right now).
Wood- for this design I used a piece of basswood 12 in x 6 in (available at craft/hobby stores)
Cut tacks no longer than 7/16 inch, depending on the thickness of your wood. I choose copper tacks to match the colors of my thread, but they also come in silver and black. Other DIY's for string art use other kinds of nails or tacks- choose what you prefer, just make sure they have a decent sized head.
Embroidery thread in desired colors. For the ombre look I used three colors (DMC #351, #352, #967)
Hammer (I had the best results with my short and stubby hammer, but any size will do)
Pliers (preferably bent nose jewelry pliers)
Scissors
Washi tape (or any light tack, removable tape)
Optional:
Ruler (to measure the space between tacks)
Self healing mat (to protect your work surface)
Let's get started...
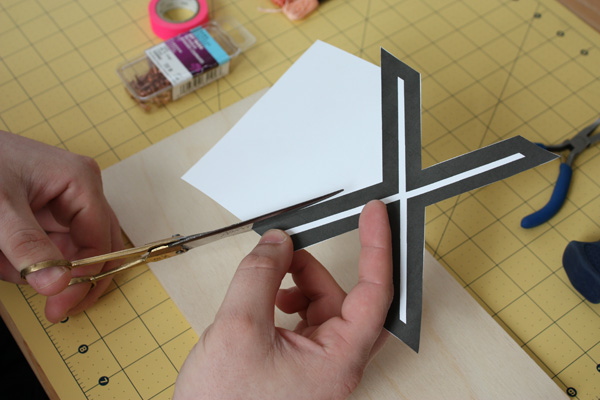
One.
Cut out your stencil. For letters, don't worry about cutting out the inside of letters like 'o', 'a', etc.


Two.
Using the washi tape, tape your stencil down to the wood. Be careful to not place the tape close to the edges.


Three.
Line your stencil with tacks. Use the pliers to hold the tack while you hammer it into the wood. This will save your fingers and keep the tack from going in at an angle.


Four.
Remove the paper stencil by gently pulling it through the tacks. Don't worry if a tack pops out- just hammer it back in.

Start your thread by tying a double knot around one of the tacks (start where ever makes sense to you, it doesn't really matter).

Line the section you're working on (if you're only doing one color, line the whole shape). You'll need to decide which makes the straightest line- lining the inside or outside of the tacks- then loop the thread around each tack to secure it.

Seven.
Begin filling the design in by crisscrossing the string around the tacks. This is fairly free form, just make sure to cover the whole section by looping around different tacks and using different angles until you're pleased with the design.

Eight.
To finish a section after it's filled in simply tie another double knot by looping the end of the thread around a tack and knotting it.

Continue steps five through eight until each section is complete, and you're done!


There are countless designs you can use for a string art project, we did two word designs and one large heart, all using an ombre pattern. What design will you use? If you make your own string art I'd love to see it! Send me a photo or tag me on Instagram (I'm @gatherandhunt).
adorable! love this! if only i had time to make one of these for vday! great job!
ReplyDeleteMuffin! I was thinking about you at Alt Summit this year- wishing you were there with us!
DeleteThanks! Make for some other day instead?
I love nail and string art! The heart is my fave. Great job!!
ReplyDeleteThanks Melissa! It's so fun. I want to find one of the kits from the 60's a make a retro one now!
DeleteSo great! You've inspired me to try some string art. Love the history bit too :)
ReplyDeleteGlad you liked the history- I always feel like a geek with that stuff, but vintage is all about history, so I've gotta bring it!
DeleteThis turned out so great! I love all the string art that's out lately but I never get a close up view of how to actually do it! Totally saving this for when I find the time to make one! :)
ReplyDelete